04/11/15

Fun with a broken Canon EF 28–70mm f/2.8L, or how I learned to love/hate USM.

Before I got back into photography with the amazingness that came with the digital camera revolution, I had always looked from afar at the older Canon L lenses and their fancy red rings. These pro lenses have always been out of reach for me financially, since it doesn’t make much sense for a hobby photographer to go and blow $1,400 on a lens.

But, I’ve finally caved in and bought one. Not a new nice lens, heck, not even gently or heavily used but working lens. I decided to get a clapped out, bottom of the Ebay barrel, broken and non functioning used lens. Hooray! This older 28-70mm came from a fellow in New York who trained parrots, so I’m not sure what it may have experienced in its life span. Its zoom function was very stiff as if it was binding on something, mostly it did not like to reach the stop at the 28mm side, also the auto focus was not working and would go “clack clack clack clack” when trying to focus jumping all around never reaching its target.

The lens in good physical condition for something that has not been made in at least 13 years (production ran from 1993 to 2002), and has no fungus or glue separation issues on the glass, just mechanical problems. So I figured, what the heck, lets try to fix it.

First thing I did was try to read up on what type of USM drives Canon used in their lenses, and also what the heck a USM drive actually is. What I found out is Ultra Sonic Motors operate on vibration, hence them being ultra sonic. This means that the focus motor runs the camera lens like one of those old vibrating football table games. From this ultra high frequency it can run the motor forward and backwards depending on what wave it generates. I’m not going to go into this to much further here, but if you interested in finding more Wikipedia has a bunch of info on it that is really interesting, or hit up my original thread over at FredMiranda.com, some users over there had some good info.

I then started trying to source some parts to fix my lens. But since the 28-70mm has not been made in so long, all the parts are out of production and Canon no longer services it. This got me thinking, since the USM focus drive motors seemed like a very expensive thing to have placed into production, it would not make since for Canon to redesign them for every lens. The research and development on that would be crazy, plus why make new focus motors for your other lenses if you have a perfectly good working one in production? From what I’ve found this is about what Canon thought too, they only have two motor sizes of USM drives they make. A 62mm and a 77mm, the 77mm motor being the one I assume is used in all larger L based lenses (don’t quote me on that, its just a guess). Also the other lenses USM drives appear to only have different shaped or length ribbon connecting to the motor.

So, I took a chance and ordered a USM drive/motor for a newer lens, the Canon EF 24-70mm F/2.8 L USM -Part# YG2-2064-000

As luck would have it, the motor and ribbon cable on the newer lens are exactly the same as its older 28-70mm brother. So, here’s how to replace it.

(NOTE, if you decided to tear your expensive lens apart and manage to mangle it somehow, its not my fault. Also replacing the USM drive will not fix all focus problems, lenses are complicated, lots of things can break).

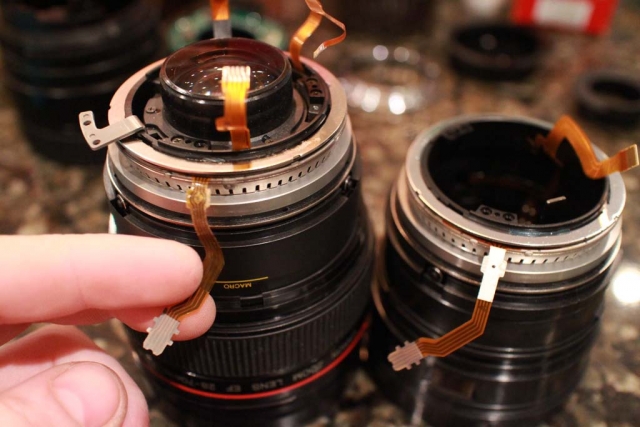
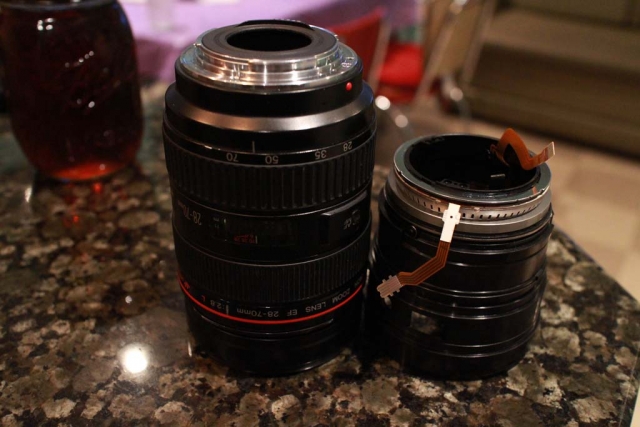
1. Here is the 28-70mm next to the 24-70mm’s focus motor assembly. Gives you a rough idea how the part fits within the lens.

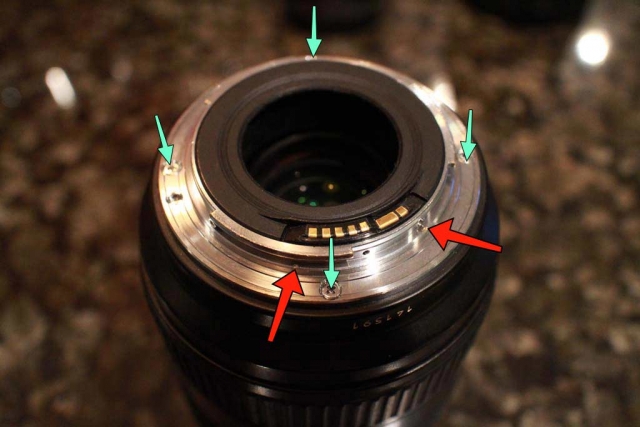
2. Time to tear into it. Using a set of JIS micro screwdrivers (don’t use standard phillips screw drivers, they will just strip the heads), take out all arrowed screws.

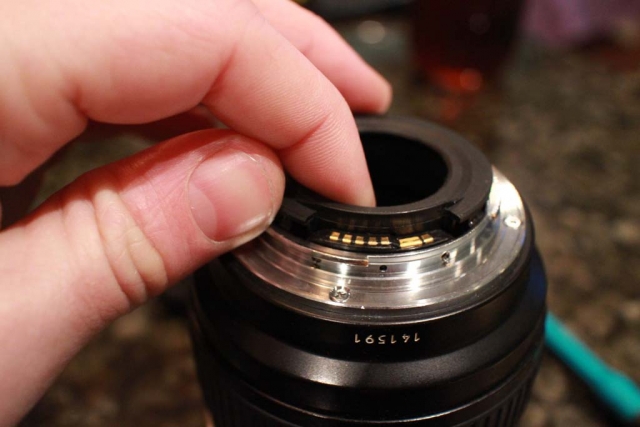
3. Pop the center ring out by pulling straight up on it, make sure to keep some pressure down on the lenses rear mount flange so you don’t damage lenses contact connector.

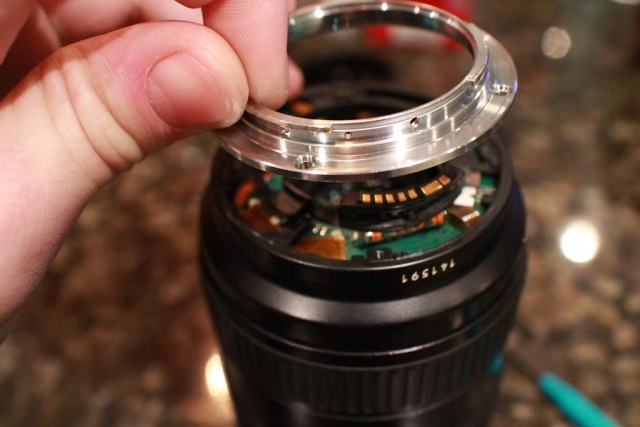
4. Lifting the rear mount off.

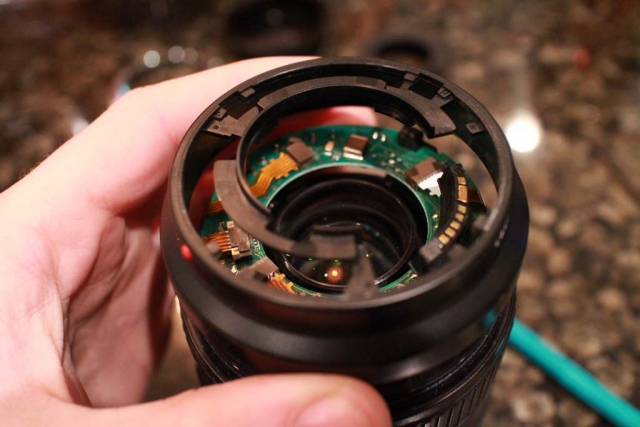
5. Next section comes straight off now exposing the lenses PCB.

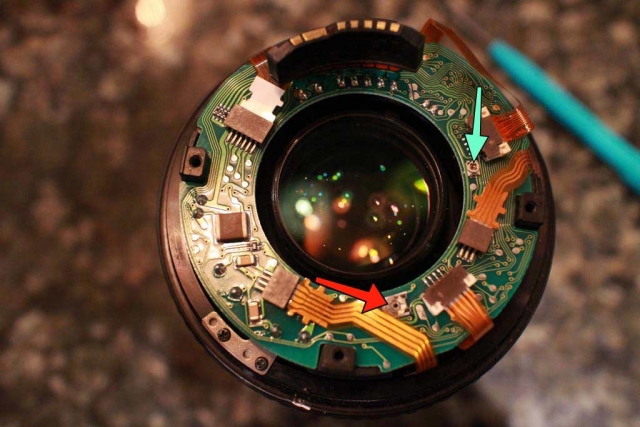
6. The lenses PCB. Red arrow is the USM motors pulse setting screw. The USM stator is divided in two halfs, and ran by pulses, which are supposed to be sent in equal spacing, such as:  –  –  –  –  –  –  -. If the pulse are out of adjustment it may appear staggered or off balance such as: —– — —– — —– — —–   This is bad, Turning this screw will change the pulse spacing, but without an oscilloscope this is just kind of trial and error. Its supposed to be adjusted after changing out the focus motor or PCB, but on my lens at least it seemed to be about right even after the motor change. The blue arrow is the frequency adjustment screw which you can use to change the frequency the motor runs at. I don’t have the service manual in front of me at the moment for its intended value, but its best not to mess with this one, or if you do mark where it was set at (actually do that on both if your playing with them).

Back to tearing things apart. Lightly tug on most of the ribbons to unplug them. Release the locks on the two ribbons that use them, then just pull the PCB up and out once all is disconnected.

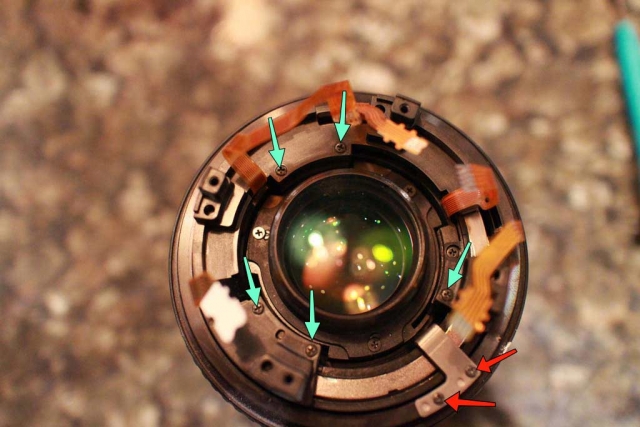
7. Remove the marked screws.

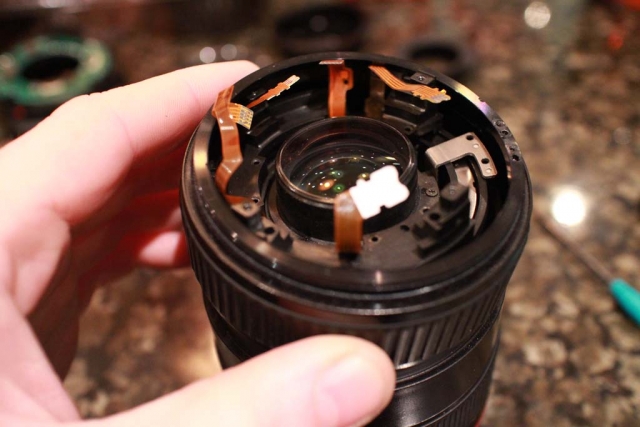
8. After removing the screws, just pull up on the barrel section feeding the ribbons through it as you go, make sure to fish it around the metal zoom stop, it will fight you a bit. Pull up the zoom ring next and slide it off in the same manner.

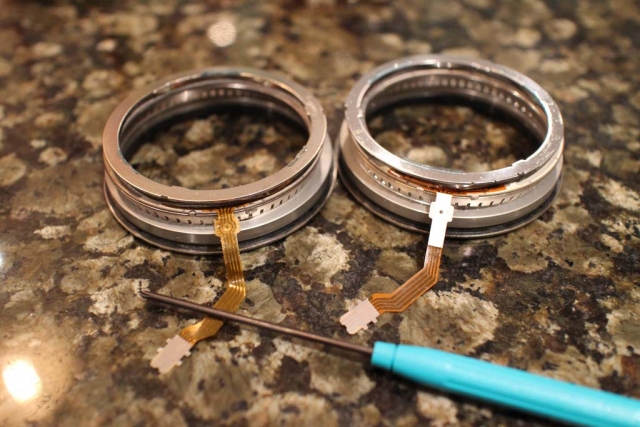
9. And here is the USM motor. Notice that the motors on the both are exactly the same, same ribbon shapes even. The top ring of the motor is glued on, so just spin it until it twists over to the release points. (I did not use glue on re-assembly, it seemed to act fine).

On my lens I ended up having to use the old rotor (bottom thick ring), new stator (notched teethy ring), new felt washer, and old spring/lock. The rotor may have been slightly taller on the newer 24-70mm motor, but I’m not sure. I will say I had to put the lens back together and tear it down around 4 times before it was happy with the combination new/old USM motor parts I picked and was working correctly. I would have to guess that USM drives are not meant to be replaced in this manner, but rather as whole assemblies which are pre adjusted and working from the factory.


Old USM motor from the 28-70mm on the left, newer 24-70mm Mark 1 motor on the right. Pretty much identical.


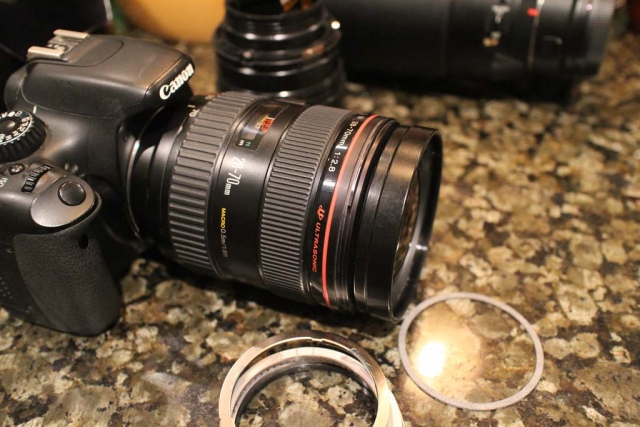
28-70mm all together on my T2i working like a champ.


So now that its back together, what do the pictures look like? Well…. odd. The lens seems to be out of collimation, especially when used at 70mm. So I took a few shots on the wide end of 28mm and they turned out okay-ish:

So the 70mm end is out of wack, its not the end of the world. Heck this way it turns things into a blurry mess that sort of look like an impressionist painting. Its not broken, its a specialty lens!


Sometime soon I’ll send it off to a repair shop for a cleaning and lens calibration, but for now its on abstract duty.

 

07/30/14

Fun with a Bausch and Lomb Cinemascope with Vid-Atlantic clamp

Long title, eh? So recently I ran across post on Petapixel.com about using anamorphic lenses with DSLR’s for ether video or stills. However the cost of most anamorphic lenses are crazy high, it seems that the demand has really ramped up on them. So while trying to figure out a cheap way around the problem, I decided the best bet was to head straight into the depths of Ebay and see what floated to the top.

After a good long while of poking around I finally found something cheap, it was a Bausch and Lomb Cinemascope 2x anamorphic projector attachment for roughly about $25. It was not pretty, but looked to be usable still and at $25 bucks I felt it was safe enough to just take a gamble on. So the big old lens showed up a few days later in the mail, and holy cow was it built well. This is not a light lens. This is a very, very, heavy lens with some seriously thick glass. Its really quite impressive. When this was in use, it would have been mounted on the front of a projector to take a squashed Cinemascope film, and stretch it to twice its width creating the more familar wide screen films we are used to seeing. Its kind of neat to think about how many movies may have filtered through this lens over the years. More information can be found here

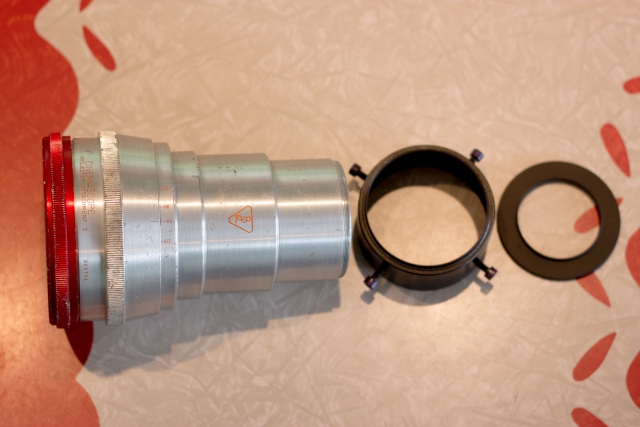
Vid-Atlantic makes the most popular Anamorphic lens clamps and accessories for anamorphic lenses, so after a quick few measurement an order was placed for their 72mm Anamorphic Lens Clamp, and another for a 50mm to 72 mm step up ring from Adorama so that I could attach the whole mess to the front of my 50mm lens. So here is the whole kit ready to go;


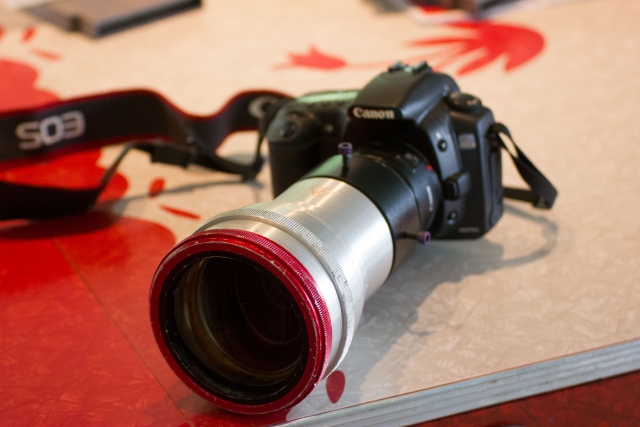
And here it is all assembled and attached to my Canon 20DA along with the little plastic nifty 50mm 1.8.


From here out I was using my Canon T2i in place of the 20DA.


First things first, for projector attachments you need a lens between the anamorphic lens and your camera. This is because all the aperture control and half the focusing has to be performed on the camera lens.

If you end up with a heavy anamorphic lens, or a B&L like I got, make sure the lens you attach it to has a metal body and is well built. There is a lot of weight hanging off the front of your camera with the adapter/anamorphic attached, and using the nifty 50mm with its plastic body is a bit scary. It always seems like its right on the edge of breaking in half or busting something. Also when picking a lens to use make sure you get one that doesn’t have a rotating face, as the anamorphic lens has an actual up and down, and if your lens face is spinning its also going to spin the projector lens and mess its alignment all up. Also turn off autofocus if your using a newer lens, you don’t want to kill your lenses focusing motor or gears having it trying to move that giant chunk of aluminum you screwed to the front of it. One more thing to note, depending on what anamorphic lens you wind up with, you may not want to go any wider then a 50mm or 55mm lens as vignetting can occur in the corners. My 70mm works fine, but the nifty 50mm as you will see is right at the limit and 95% of the time cuts the  corners out. Vid-Atlantic recommends getting a Helios 40-2, which I assume is because of build quality, flares it produces, and focal range. Flares are somewhat dependent on the lens you choose as well.


Anyways, with that out of the way time to go shoot some stuff. First thing that you’ll notice is that images seem to be harder to focus, because they are squashed horizontally. Its can be hard to get a feel for when your in focus, and when your out, although I imagine with practice that can get better. Shot composition gets a little trick because of this, since everything you see on the camera is distorted, but again with practice it gets better. When shooting the focus ring on the lens is hard to reach behind the big old B&L adapter. So much so that I resorted to jiggling my camera vertically most of the time in order to rack the lens out since I couldn’t get my fingers on it. I assume that part of this was the poor little plastic bodied lens binding from the weight. I ran into a few times where the lens step up filter was trying to unscrew its self, or times where it became loose. This can really upset a picture if your anamorphic rotates away from its correct position. Think of it like taking a square thats your picture, then if you turn the projector lens on the filter its squashing that square into a parallelogram. But a quick twist of the B&L straightened things back out.

Focusing I would say was the biggest issue. I have heard that some people say these lenses are fixed for 50′-200′ focal ranges as that’s the distance they would be normally be projecting to a movie screen. However, I was getting shots at 15′ and even 5′ sometimes that were clear. It was much easier to focus at 50′ plus, but closer shots did seem possible. The close shots seemed somewhat random though as most would up blurry, so more experimenting is needed.

On to the shots!

Edit: Threw in a few flair shots since some people may be interested in them. Its actually rather hard with the 1.8 mounted to get it to act up unless you shove its nose directly into the sun.


You can see a few of the corners on the above files are a bit cut off with the Canon 50mm 1.8, but it seems to shift a bit and sometimes goes away depending on the lens rotation. As before, a longer lens like a 55mm+ would clear that up.


So what do these images actually look like when your looking through the view finder and on the camera? Here’s an example of one that I liked and how it turned out:

Processing time, expanded width by 200%

Post work

Remember that when shooting with an anamorphic lens your camera is taking in the same amount of data it normally would for videos or a photos, when you stretch it your losing about half your horizontal data/quality. Just something to keep in mind if you notice the quality seems a little off to what your used to when your reviewing your shots.

And here is a short, but bad test video I did with it on the T2i. I was just holding it with no support so its a bit wobbly and out of focus;


08/28/13

Celestron C90

I got a new lens/telescope! Its an old Celestron C90 Spotting scope from the early 80’s, and is quickly becoming one of my favorite new lens (telescope?). I’ll be throwing up more pictures over time, but for now here are a few with my trusty old Canon T2i. Saturn/moon shot was with a 18mm Celestron kellenar eyepiece and a Meade .965 basic camera adapter. Looks better on the scope then how the pic turned out. Funny how one lens can take a close up shot of a bee and still be able to reach out 900 million miles to pickup Saturn.

06/26/13

Osawa MC 28mm

So this in the Gallery as well, but figured what the heck, add it to a post.


All below shots were taken using a Canon T2i with an Osawa MC 28mm/2.8 lens that came off Ebay for 9 bucks. I’m by no means a lens expert so you can judge the results for yourself. I dig it, not a bad little lens.